
You can spend an eternity thinking about labels and packaging, and tweaking designs.
I think the best thing to do is just sit down, design something, and send it off to a printer (or print it yourself) all in one go.
It’s one of those decisions that’s best made fast, especially if it’s holding you up from getting selling.
The assumption here is that you’re new to selling microgreens, and the most likely way you’re packaging your product is in plastic bags, or in plastic clamshells.
You can print your labels directly on your packaging, but when you’re first getting started there are a lot of variables:
- How much product per package?
- What varieties will be popular?
- Will I keep selling?
- How much money you have to invest
What to include on microgreen packaging
Your packaging is how you directly interact with your consumers. It’s a critical element in the customer experience and how they perceive the value of your brand.
What you include on your packaging is a combination of practical and design elements. The goal is to give people everything they need to know to be comfortable buying your product. You want to remove as many unknowns as possible, while still having a nice design.
Here are some things you might consider including
- Certified Organic: If you have an organic certification that you worked hard for, definitely show it off.
- Pesticide & Herbicide Free: Definitely call attention to this, even if you’re not certified organic, if you’re 99% of the way there (just missing the paperwork and inspections) your customers will want to know about it.
- Grown using organic seeds & soil: Again, even if you’re not certified organic, but you’re using organic seeds and soil (you should be!), show it off.
- Recyclability/Biodegradability: you could bring attention to your forward thinking packaging choices if they’re recyclable and/or biodegradable.
- Harvested-on date: I like this more than best-before. If you’re just selling direct or at farmer’s markets you probably don’t need this, just tell people it was harvested today!
- Net weight: tell your customers how much product they’re getting, this may also be required depending on your area
- Keep refrigerated: just in case, you never know how sophisticated (or not) your customers might be
- Variety of Microgreens, for example pea shoots, or broccoli microgreens
- Your brand name: you want people to recognize your brand so they know you’re around and they can support you in other ways and spread the word.
- Website/contact information: especially if you’re selling in a grocery store, but also do sell direct to consumer. Give your grocery store customers direct access to your website or contact information and you can sometimes cut out the middle-man.
- Point out that you’re local. A lot of people like supporting local businesses, it could make the difference on more sales than you think.
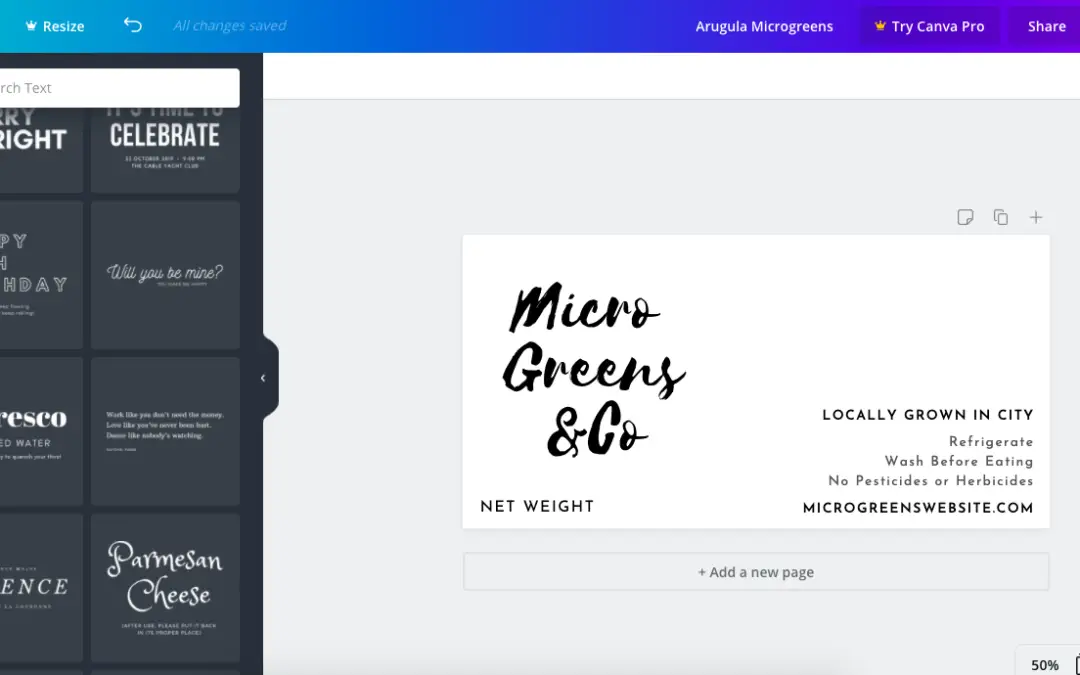
Here’s a simple example, and it’s pretty much what I use!
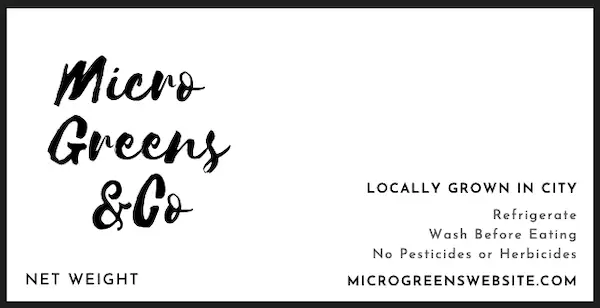
I created the above microgreen label using Canva, a free online graphics editor. It doesn’t have a lot of features, but it’s simple and easy to use. A couple notes about the above label:
- I print it in 2″ x 4″, big enough to be easy to read, but still shows the microgreens.
- Check with your print shop how wide the borders need to be for them to look even, “bleed” printing where the ink goes right up to edge relies on accurate alignment
- This label design is usable for herbs, microgreens, edible flowers, anything really, because you write in the net weight and what you’re selling in the blank spaces.
- If you print on vinyl like I do, you need a good permanent marker like a sharpie to write on it
To get a bit more inspiration for microgreen packaging, check out this pinterest board I created:
Microgreen Packaging Inspiration (Links to pinterest board full of photos and ideas)
How much should you spend on Labels?
How much you spend on labels depends on how many you order, if you go full color or black and white, and what kind of printing you use (DIY laserjet/inkjet, buy a specialized label printer, or use a professional printing company).
Stickers are definitely one of those things (like most printing) where volume is king. The more you order, price per unit drops drastically. Fortunately there are some work-arounds for smaller quantities.
Getting “nicer” more expensive labels is a double-edged sword. Spending more on labels means you’ll need to charge more for your product, or make more money yourself. If your packaging is clear, your products can show off.
DIY Printing on a Laserjet/Inkjet
This can be a really quick way to get up and running. For under $10 on Amazon you can order 250 4” x 2” labels on an 8.5” x 11” (typical paper size) that fit right into the printer you already own. That works out to 4 cents per label plus the cost of ink and wear-and-tear on your printer.
This is definitely the cheapest way to get up and running, and can give you some room to experiment and settle into a design you like before placing an order or buying a specialized printer.
Using a professional printing company
This will be your highest cost per label, but you don’t need to invest in a printer, so the cost can be lower up front than printing your own high quality labels at home.
There are a ton of excellent printing companies online that can print any color, any size, and in a lot of different finishes. You can choose different quantities, and even cut-out the stickers into a specific shape if you want.
For me, the biggest reason to use a professional printing company is that they can print on vinyl really crisply, and the quality and sharpness is top notch. It’s also easier to do full bleed (printing right up to the edge of your sticker).
For comparison, a 2” by 4” sticker in vinyl costs $0.40 each if you buy 250, or $0.17 each if you buy 1000. So it’s more expensive, but you get what you pay for, especially if you’re ordering larger quantities.
Balancing design and practicality
Some packaging is packed with information, more than the customer needs, but has terrible design.
And you definitely want to put at least a little bit of thought and quality into your packaging, or else something like this could happen:
Designs can also be too design heavy, and the customer finds it unfamiliar and doesn’t even recognize the product the packaging is supposed to be showing off.
The design of your labels is really important because it’s a huge part of the perceived value of your product. People decide whether to buy or not based on the information that’s in front of them, especially when seeing your product for the first time.
You want you packaging to catch their eye, but make sense. Neon colors on microgreen packaging would seem out-of place.
Choosing what quantity to sell initially
A key decision you’ll have to make when you start selling microgreens is what quantities to package them into.
Should you sell smaller packs?
Large Bags?
It’s tricky to decide at first, but what you can do is look around locally and see what the competition is doing.
In my area 1.5 oz to 4 oz (weight) sizes are common. For my first packaging I ordered a 16 fluid ounce container, it’s marketed as perfect for 2-3 ounces (weight) of microgreens, but I find it can easily fit 3-4 ounces.
Whatever packaging you end up using, you want to get a good idea how much product you can comfortably fit inside of it before you print your labels.
Some microgreens are used primarily to add color, or are really tricky to grow, like amaranth, beets, chard, and chives. If you have success growing these microgreens, you might consider selling them in smaller quantities.
No one is making a salad out of chives or amaranth, they’re just a finishing a touch.
Maximizing flexibility
So to maximize flexibility initially with your labelling, you can get a plant-based plastic packaging (I use these). And then apply stickers!
Stickers give you incredible flexibility if you design them right, you can write in the quantity and type of microgreen by hand. That way you can order one batch of stickers and you’re good to go. You’ll avoid the problem of ordering a bunch of labelling that you’ll never use (say if you decide chard microgreens are too hard to grow).
You’ll also cut down on your initial investment.
Another way to get even more flexibility is using plastic bags. Bags can be bought in a ton of different thicknesses, I’d recommend going with at least a 2 mil thickness bag.
Label Materials
Labels can be made from different materials. The material of your sticker labels is important because it impacts recyclability, look, and waterproofness.
Stickers that tear apart or are otherwise hard to remove from packaging are a huge problem for recycling. Many recycling facilities won’t accept recyclables that have difficult to remove labels, they go into the landfill.
This city in Canada lost $400k because of difficult to remove stickers. They ended up racking up $300k in storage fees, and another $100k to landfill the recyclables all because of label materials.
Vinyl-based stickers
Vinyl stickers are tough, they conform to the surface you’re sticking them on (great for shaped surfaces), and they’re waterproof. The ink won’t bleed and the stickers won’t disintegrate if they’re exposed to water. They usually have a semi-gloss look, which is perfect.
Another bonus is that they’re easy to remove from packaging for recycling. They come off in one piece, and usually pull their adhesive off with them.
I use vinyl stickers.
Paper-based stickers
Paper-based stickers are cheaper, generally have stronger adhesives, and are better for DIY. You can get paper-based stickers made professionally, but also buy blank stickers that will fit in a home computer printer. They’re usually more matt in finish, but glossier finishes are available too.
This can be a good way to experiment at first at really low cost, but they don’t have quite the same quality. The DIY ones usually aren’t quite as crisp, and you’ll spend a lot of money on ink if they’re printing a lot of them.
I find it’s best to settle on a design, and order professional stickers. A lot of the big shops online for stickers offer free shipping, so that’s pretty handy!
If you do decide to try your hand at printing your own stickers, you can some online here:
Blank White Permanent Adhesive Labels for Laser/Ink Jet Printer (4 x 2″ – 10 Per Page | 250 Labels)
DIY vs Hiring a Print Shop
You can print your own labels at home, it might be a good idea if you want to experiment with different types.
But what I would recommend to most people, is design a flexible label where you can write in your quantity (net weight) and variety (type of microgreen).
Get a batch printed that will last you a couple of months of selling, then make tweaks from there.
In my area I can get high quality Vinyl 2” x 3.5” stickers for $0.57 each for 100, but the price drops to $0.14 if you order 1000. That’s a huge drop in price, the economy of scale is really good with stickers.
Top places to order stickers online:
Free shipping, huge selection of sizes and finishes (matt, glossy). These guys are specialists in stickers and labels of all kinds.
This company does professional printing and custom labels. They also sell blank labels that you can print on with your own inkjet or thermal transfer printers. Labels by the page and by the roll are available. They have a huge selection.
Conclusion
Spend $10 on Amazon if you have a printer at home and experiment with label designs until you settle on one you like.
Then I’d recommend having vinyl stickers printed online professionally, keep the design flexible by leaving blanks for net weight and variety, then you can use them for everything you grow.
You have the flexibility to try different varieties and selling in different quantities. Figure out what works for your market, and look at what the competitors are doing.
Down the line, consider investing in a specialized label printer, you may be limited to black and white depending on which one you choose, but it can be a great way to gain even more flexibility in your labelling, and print labels on-the-fly if you make any tweaks.
Next Steps
If you haven’t already chosen your packaging check out my article for some major mistakes to avoid, and how to make sure you’re not making tone-deaf packaging choices for the microgreens demographic:
Packaging for Microgreens – Giant Sourcing Guide with Tons of Options (Links to Article)
Starting a microgreen business forces you to make a lot of decisions. To walk you through some of the decisions I’ve been making, and what I’m thinking about, I’m writing a “How to sell Microgreens” articles series.
More coming soon (very soon)!

I’m Alex Lafreniere. I learned a lot about plants when I built and operated a landscaping company. I learned even more when I started growing and selling Microgreens. But, learning is a journey, not a goal. Ever since travelling across the world, I’ve wanted to find ways to bring more delicious and exotic plants into my life. This is the site where I share everything I’ve learned with you. And maybe we’ll learn a thing or two together.
This site is owned and operated by Plant Hardware, a sole proprietor headquartered in Calgary, Canada. Plant Hardware is a participant in the Amazon Services LLC Associates Program, an affiliate advertising program designed to provide a means for sites to earn advertising fees by advertising and linking to Amazon.com. Plant Hardware may also participate in affiliate programs with Bluehost, Clickbank, CJ, ShareASale, and other sites. Plant Hardware is compensated for referring traffic and business to these companies.