
The eleven steps to grow microgreens in 2020 are:
- Sterilize your seed
- Soak seeds to encourage even germination
- Drain seeds and rinse
- Mix, sift, and measure soil
- Prepare flats (spread soil, water)
- Plant seeds evenly at correct density
- Cover for blackout period (sterilized empty flats), stack or weight
- Uncover once germinated and expose to light
- Harvesting
- Washing
- Sanitize (work area, flats, equipment)
2020 is a better time than ever to get into growing microgreens. With the explosion of available products on Amazon, the profit potential, and the ease of finding information, you can grow microgreens with more confidence than ever before.
Microgreens can provide an incredible amount of food from a small space, but it’s not a walk in the park compared to other ways of growing food. You need to get your conditions (temperature, humidity, lighting) dialed in. Seed and soil costs are high relative to gardening or farming outdoors, you can lose money if you don’t do it right.
An important thing to keep in mind with microgreens is that they’re easily scalable, and you can do it quickly. So this means you don’t need to bite off more than you can chew. Setup a small grow with a couple of trays (for personal consumption), or one or two shelves worth (16-30 trays) is you’re selling. Expand once you’re consistently growing and eating or selling all of them.
Microgreens can be grown indoors, or out.
Outdoors you’ll have to do a little more prep to get the soil nice and evenly flat, but otherwise they grow great. The speed microgreens grow at keeps them well ahead of weeds. You’ll need probably need to clean them after you harvest, because soil can get splashed up into the vegetation by watering and rain.
Indoors, microgreens are often grown on shelves under LED or fluorescent light. You can be a lot more careful indoors, so it’s even possible to harvest microgreens and eat them without washing. Washing damages the cuticle (outer layer) of plant tissue. The lowered protection mean plants can spoil quicker. It’s counter-intuitive, but washing greens can actually be less sanitary in specific situations.
The 11 main steps you need to get familiar with for growing microgreens are laid out in the table of contents below:
Sterilize your Seed
I’ve definitely noticed the most fungus problems in two situations: older seeds, and sunflower seeds. Sunflower seeds often have fungus spores that germinate after you soak your seeds. SO even if your trays and soil are relatively sterile, you can have fungus problems.
You can sterilize with a lot of things, but something that works well is a mix of hydrogen peroxide, white vinegar, and water in the following proportions:
- Four teaspoons of white vinegar (typically 5% acetic acid)
- Four teaspoons of food grade hydrogen peroxide (typically 3% hydrogen peroxide)
- 1 quart of room temperature water (just under 1 L)
Soak for 15 minutes to give the sanitizer a chance to work, and also to partially hydrate the seed hulls. Drain and rinse with fresh water. Discard any broken seed or debris if it’s easy to pick out as it can decompose while your microgreens grow.
Don’t sterilize mucilaginous seeds. These are the seeds that develop a gooey gel coating when they’re hydrated. Chia, brown mustard, curled cress, basil, and arugula are all mucilaginous. You also don’t need to soak seeds that you plant dry (typically smaller seeds) like radish or broccoli, and brassica blends.
Soak Seeds to Encourage even Germination
After sterilizing, immediately soak your seeds. Overnight is a good option, I tried a few trials of soaking seeds between 6 and 12 hours, and didn’t notice a difference in yield or fungus rates. Rinse the seeds out in the morning.
Only soak as many seeds as you’re going to plant right away. To find the amount of seed to soak, check out my seeding density calculator. https://planthardware.com/microgreen-calculators/
Some common seed amounts (by dry weight) per 10” x 20” flat:
- Sunflower: 150 grams/ 5 ounces
- Pea: 250 grams/9 ounces
- Broccoli Brassica blend: 30 gram/1 ounce
- Radish: 30 gram/1 ounce
Drain Seeds and Rinse
It’s important to thoroughly drain and rinse seeds with clean water. Make sure your buckets or water vessels are sterilized as well, otherwise your nice wet seeds will be a great environment for whatever’s growing in/on the bucket.
You want to plant right away, so do everything you can to soak, rinse, and plant without too many gaps. A little scheduling can save you a lot of time and materials.
If you absolutely have to delay planting, you can treat your seeds like sprouts. The idea is to rinse and drain them twice per day. After draining them you don’t want them to sit in stagnant water, so if they’re in a jar, lean it up sideways so it drains, or strain the water out, then place them in a dry jar. The idea is to keep them moist, but without standing water.
You can only get away with this for a day, or at most two. It’s better to plant your seeds, even if you don’t have enough room under your lights.
Mix, Sift, and Measure Soil
Soil straight out of the bag can be used, but it’s best to do a bit of preparation. I use a potting mix or sometimes a seed starting mix. The mixture has some hardened clumps, and larger chunks of organic matter like twigs and the occasional rock. To get more even growth and germination I sift my soil.
I use a ¼” by ¼” soil sifter. It’s a 4” deep ring of plastic with a metal mesh, similar to chicken wire. The fine ¼” size is great for microgreens. It’s nice to sift a whole bag into a large plastic bin, then it’s ready to go whenever you need to plant. Sifting can be a little messy so do it somewhere with a nice smooth floor that’s easy to sweep, or outside.
Prepare Flats (Spread Soil, Water)
Your seeds and soil are ready to go, the next step is to measure out the soil, and put it into the flat. I use 1 inch deep flats and fill them up with 3.5 quarts (3.5 L) of soil. I spread it around and pat the soil down lightly by hand, this helps move the soil around a bit and fill in any low spots.
I forget where I first saw the idea, but I have a piece of wood that just fits inside a 10” x20” flat. I use this to press down the soil evenly and firmly. I probably put about 30 lbs of force.
Then I add 1 quart (1L) of water evenly across the surface. The idea is to evenly moisten the soil, but not so much that’s it’s soggy and running out of the bottom. You should be able to lightly squeeze the soil without squeezing water out. This means the soil is well hydrated, and there’s still some air in the porosity between the soil particles. Remember, roots need water and nutrients from the soil, but they also need to breathe.
For watering use something that spread the water pretty finely (smaller holes), if you don’t have a watering can or a nozzle that can do this, you can also bottom water. Bottom watering is adding the water between a solid tray, and a tray with holes in it containing soil. The water will wick up into the soil through capillary force and spread out fairly evenly.
It might be a good idea to give the surface of the soil a quick misting before putting down the seeds so they’re all in contact with moist soil. This helps even germination.
Plant Seeds Evenly at Correct Density
Now it’s time to plant the flats. The most important thing to get right, is to evenly spread the right amount of seeds. Too few seeds and you’re using more soil, water, and energy than you need, and too much and you’re at risk of mold.
To find the amount of seed to soak, check out my seeding density calculator.
https://planthardware.com/microgreen-calculators/
There are a few different ways to spread seeds. I usually put them in a little jar and shake it as I spread them. It takes a practice to do this quickly and evenly, but go slow and you should have pretty even results. Make multiple light passes as you spread for the most even coverage.
Cover for Blackout Period (Sterilized Empty Flats), Stack and Weight
Now cover the planted tray with another clean tray with no holes. This empty flat will serve a few purposes:
- Keep the seeds in the dark while they germinate (blackout period)
- Increase humidity near the seeds, retaining moisture
- Press the seeds into the soil, ensuring good seed to soil contact.
- Deflect new roots sideways and down towards the soil
You can stack a few planted trays on top of each other. I add some books or jugs of vinegar or water on top for weight. 10-15lbs seems to do the trick. You want to make sure the tray on top has been sterilized. You have to clean everything between batches or you will have mold problems sooner or later.
Uncover Once Germinated and Expose to Light
I usually do a blackout period of 3 to 5 days, then expose them to light. When you uncover the trays, some seeds will be stuck to the underside of the tray on top, give it a few taps to loosen them. Your soil probably still has enough moisture in it, except around the edges where some has evaporated.
I use a little spray bottle to add about a cup of water to the edges of each tray, where water was able to evaporate during the blackout period.
You can modify the shape of your microgreens by playing with the light levels when first uncovering them. A longer blackout period and keeping them out of bright light after the blackout period will cause them to stretch, lengthening the microgreens. If you’re having trouble harvesting because they’re so close to the soil, a bit of stretching might be what you need.
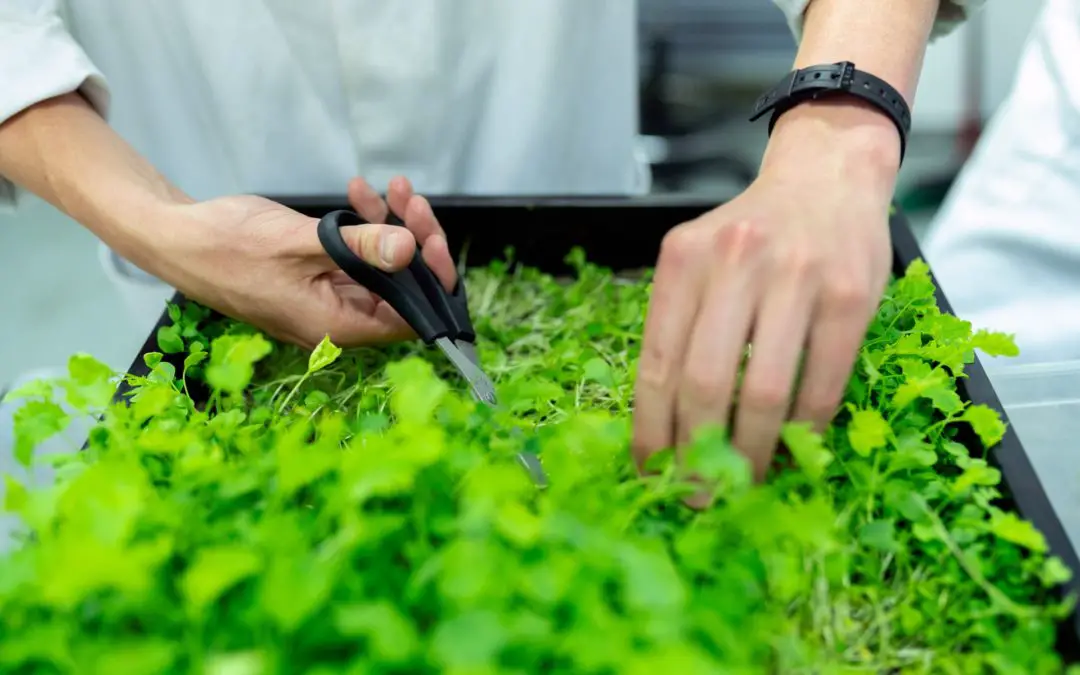
Harvesting
After a blackout period and between 5 and 9 days under the light the microgreens should be ready for harvesting. The time will depend on the type of microgreen, the brightness of the light, and the vigor of the seeds. Underwatering causing a bit of wilting can also slow things down, as can lower temperatures. In colder climates, trays near windows or low to the floor tend to grow slower.
There are a few different methods for harvesting, I usually use a utility knife because it’s razor sharp, and easy to clean. Here are some options for harvesting:
- Utility knife: sharp, easy to clean
- Sharp chef’s knife: A chef’s knife can allow you to cut a lot of microgreens at once
- Scissors: Sharp scissors can be used and they’re a great easy option
- Electric hedge trimmer: really fast, but if not sharp can cause tearing, noisy
I like to tilt the tray up on a 45 degree angle, and then harvest from the top down. For me, this keeps more of the microgreens out of contact with the soil, it works great! You need some way of keeping the tray at that angle. I use a big hexagonal dumbbell weight, and prop the tray up against a wall.
I think a 1” tray makes harvesting a lot easier than a 2” tray. With a 2” tray, if you want to make a cut lower than the level of the rim, you’ll be at an awkward angle. With a 1” tray, you can cut straight across.
Washing
Depending on the amount of microgreens you need to wash, a few different approaches will make sense.
For a smaller volume you can wash the greens under the tap in a colander, and then spin dry in a salad spinner. If you’re careful when harvesting, and the greens don’t come into contact with soil, and there’s no evidence of mold or pathogen growth, you can eat them without washing. Check your local regulations, but that’s what I do when I’m eating them.
For larger amounts of produce, this is one potential solution:
- Have a large double stainless steel sink, one side for soaking and agitating the greens, the other for rinsing. Big bins can be used if you don’t have sinks, sanitize before each use.
- Some operations use a water bubbler. It’s a tank of water that pumps air through bubblers. It agitates the greens vigorously, but without damaging, loosening seeds and dirt.
- The first step to drying is spinning. You can buy a machine, or convert a washing machine. You’ll probably have a pretty good idea what to do by the time you need one of these, but the idea is to put your greens into a mesh fabric bag, and give them a good spin to drive water out through centrifugal action.
- Dry the greens by laying out on a drying rack (fine mesh, ¼” or smaller, window screen works great) under fans. Dry until no loose water is visible, but too much and the greens will start to wilt.
- While the greens are drying, move them around lightly after a few minutes to expose new vegetation to the airflow. Pick out deformed or discolored greens, and out of place materials like bugs and seed hulls.
- Stop drying before the greens wilt, it might take a bit of experimentation to figure out when this happens, but you’ll know!
Sanitize (Work Area, Flats, Equipment)
Sanitizing is the most important and easily overlooked step in consistent microgreen production. Sanitizing ensures you’re starting from a clean slate on every grow, and that no hitchhikers are meddling with your greens behind your back.
Sanitizing is the process of cleaning and killing any microbes and insects that may be lurking on your growing equipment. Detergents help lift dirt, and sanitizers kill microorganisms and insects.
The main workflow is this:
- Give everything a good scrub with a brush and soap, or an abrasive pad. This loosens dirt and gets the majority of the cleaning done.
- Most soaps aren’t designed to be in direct contact with food. You can use non-organic soaps even if you’re organically certified, as long as you’re rinsing properly and you follow the rules of your organic program.
- Sanitizing kills everything on the surface of your equipment. I use 4 teaspoons 3% hydrogen peroxide mixed with 4 teaspoons vinegar (5% acetic acid) in 1 quart of water, wear gloves, and wipe down everything. Bleach is another great option.
The USDA has guidelines on detergents and sanitizers for surfaces that will come in contact with food. Your local governments may have stricter requirements, so it’s a good idea to do a bit of reading, or give them a call.
USDA Guidelines on Cleaners and Sanitation (Link to USDA site)

I’m Alex Lafreniere. I learned a lot about plants when I built and operated a landscaping company. But, there’s always more to learn. Ever since travelling across the world, I’ve wanted to find ways to bring more tropical and exotic plants into my life. This is the site where I share everything I’ve learned with you.
This site is owned and operated by Plant Hardware, a sole proprietor headquartered in Calgary, Canada. Plant Hardware is a participant in the Amazon Services LLC Associates Program, an affiliate advertising program designed to provide a means for sites to earn advertising fees by advertising and linking to Amazon.com.Plant Hardware may also participate in affiliate programs with Bluehost, Clickbank, CJ, ShareASale, and other sites. Plant Hardware is compensated for referring traffic and business to these companies.